
How to Prevent DNS Hijacking with Real-Time Monitoring: A Sysadmin's Guide
Learn how DNS monitoring detects hijacking, spots suspicious record changes, and helps teams respond before phishing and service disruption spread.
How to Prevent DNS Hijacking with Real-Time DNS Monitoring: A Sysadmin’s Guide
DNS hijacking happens when attackers gain control of how your domain resolves, redirecting visitors to malicious servers without triggering a single alarm on traditional uptime checks. Your site still loads. Your ping checks still come back green. Everything looks fine on the surface, but your visitors could be landing on a phishing clone instead of your actual login page.
The fastest way to detect this is continuous DNS monitoring that watches your A, CNAME, MX and NS records and alerts you when something changes unexpectedly. That is the difference between finding out in minutes and finding out days later from an angry customer email.
This guide explains how DNS hijacking happens, the warning signs to look for and how to set up real-time DNS monitoring that can detect suspicious changes before they become a major security incident. It also covers UK-specific guidance from the NCSC and protections available through your domain registrar, including considerations for .co.uk domains and generic top-level domains (gTLDs).
A Real DNS Hijacking Incident: What It Looks Like in Practice
The scenario below is an anonymised composite drawn from conversations with sysadmins who have experienced something similar. It is not a single documented case, but it is representative of how a DNS hijacking incident can unfold.
A small SaaS company with a few thousand active users was targeted after an attacker gained access to its domain registrar account, most likely through a reused password exposed in an earlier breach.
Once inside, the attacker changed the domain’s NS records, pointing the domain to a nameserver they controlled. Because they controlled DNS resolution for the domain, they were also able to obtain a valid TLS certificate for the actual domain through automated certificate issuance. This is why the fake login page did not trigger browser warnings.
A certificate for a look-alike domain would not have been enough to fool every visitor. However, a certificate issued for the real domain will validate correctly when the attacker controls its DNS. Anyone entering the company’s URL was routed to the fake website and could submit their credentials directly to the attacker.
The company’s uptime monitoring showed the site as “up” throughout the attack. That is unsurprising: the attacker’s server responded to HTTP requests, returned a 200 status code and presented a valid certificate. Any monitoring system checking only whether the website responds will show a green status while customers are being phished.
It took 36 hours for a customer to contact support and report that the login page “looked different”. By then, an unknown number of credentials had been harvested, and the team was trying to establish what had happened, when it had started and how far the incident had spread.
This is why uptime monitoring should not be treated as DNS security. Website monitoring checks whether a service responds; DNS monitoring checks whether users are being directed to the correct service.
How DNS Hijacking Actually Happens
“DNS hijacking” is often used as a catch-all term, but the attack vectors are different, as are the controls that can detect or prevent them. Broadly, DNS attacks fall into three categories.
Authoritative DNS or Registrar-Level Compromise
This is the most consequential type of DNS hijacking because it changes where your domain resolves globally, for every visitor. Common causes include:
- Registrar account compromise: Weak or reused passwords can allow an attacker to access your domain registrar account and change NS or A records.
- Social engineering: Attackers may target support staff at registrars or hosting providers and use pretexting or forged documentation to request unauthorised changes.
- Compromised DNS provider accounts: If an attacker gains access to a managed DNS platform, they may be able to alter authoritative records without accessing the registrar itself.
Resolver-Level DNS Spoofing
Resolver-level attacks do not change your actual DNS records. Instead, they corrupt or intercept the answers returned by specific resolvers.
- DNS cache poisoning: An attacker tricks a recursive DNS resolver into storing and serving fraudulent records. The impact may continue until the poisoned cache entry expires or is removed.
- Man-in-the-middle attacks: On an unsecured network, an attacker may intercept DNS queries and return a false response before the legitimate answer arrives.
Endpoint or Local DNS Manipulation
This type of attack occurs closer to the user than to your organisation’s DNS infrastructure.
- Local malware: Malware may alter DNS settings on a user’s device or home router, redirecting that user without changing your authoritative records.
This classification matters because DNS record change monitoring is particularly effective at detecting authoritative or registrar-level compromise. It will not detect cache poisoning or a compromised home router when your authoritative records remain correct. Those threats require additional controls, including DNSSEC validation, secure networks and endpoint protection.
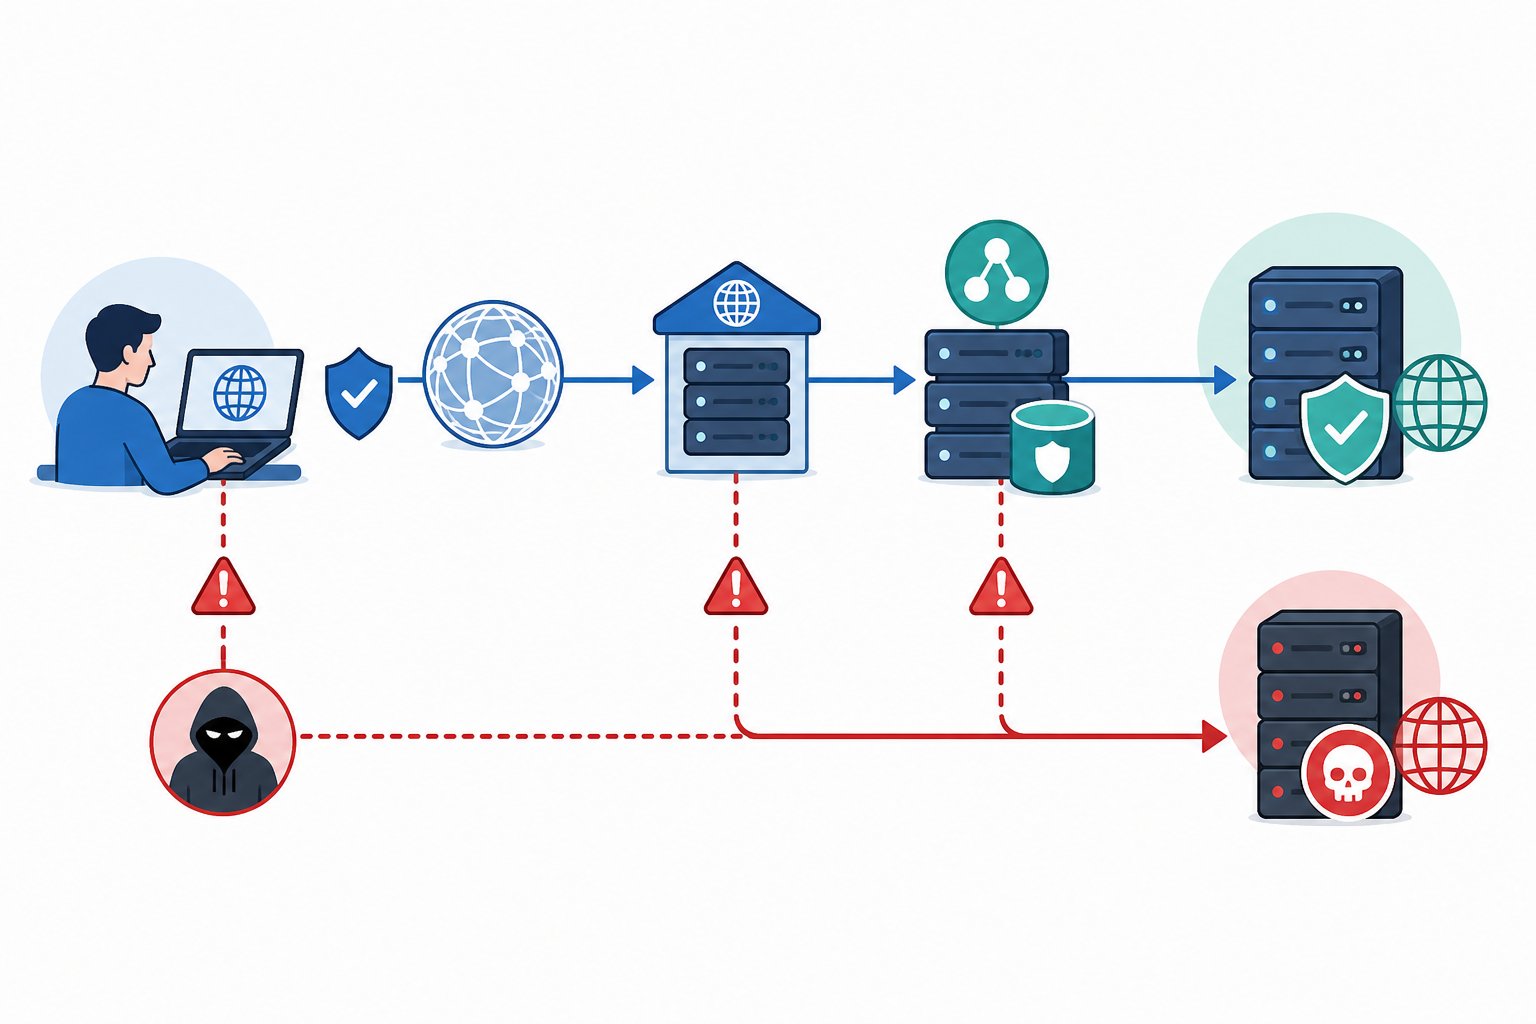
The common thread is the trust built into DNS resolution. Users and applications do not manually verify every DNS response, so attackers attempt to alter or intercept that trust without attracting attention.
How to Tell Whether Your DNS Has Been Tampered With
DNS hijacking often keeps a website technically operational, so you need to recognise less obvious warning signs and verify them independently.
- An unexpected drop in traffic: If analytics numbers fall sharply while uptime monitoring shows the site as operational, investigate immediately. Run
dig NS yourdomain.comagainst your usual resolver and compare the result with a public resolver such as1.1.1.1or8.8.8.8. A mismatch may indicate a DNS problem, although propagation and caching should also be considered. - SSL certificate warnings from users: If users report certificate errors while your SSL monitoring shows a valid certificate, they may be reaching a different server. Check Certificate Transparency logs, including the free service at crt.sh, for unexpected certificates issued for your domain.
- Unfamiliar login pages or redirects: Treat reports that a login page “looks different” as a potential security incident rather than dismissing them as browser caching.
- Email delivery problems: Unexpected MX record changes can redirect or disrupt email delivery for days before anyone links the issue to DNS.
- Unrecognised A records or nameservers: Query your authoritative nameservers directly and compare the results with your documented DNS baseline.
A standard “is my website up?” dashboard will not normally show these indicators. They require direct DNS checks, ideally performed continuously by a DNS monitoring service or platform.
How to Set Up Continuous DNS Record Monitoring
Many teams monitor uptime, SSL certificates and domain expiry but overlook DNS records. Continuous DNS monitoring closes that gap by comparing your live DNS configuration with a verified baseline and alerting you to unexpected changes.
1. Identify the DNS Records to Monitor
At a minimum, monitor your:
- A records
- AAAA records
- CNAME records
- MX records
- NS records
- TXT records, including SPF and DKIM records where email security is important
Changes to NS and MX records usually deserve the highest priority because they can redirect all website traffic or email.
2. Create a Verified DNS Baseline
Record your approved DNS configuration, including expected TTLs and the full set of values for records that return multiple answers. Some load-balanced systems return A records in a different order on each query. That is normal round-robin behaviour, not necessarily a hijack.
Store the baseline somewhere accessible during an incident, assign an owner to maintain it and record when each change was approved. A dated, versioned DNS baseline makes incident response much faster.
3. Query Authoritative and Independent Recursive Resolvers
Effective DNS monitoring should query your domain’s authoritative nameservers directly and cross-check the results against two or three independent recursive resolvers in different networks.
Checking only your internal resolver may miss an authoritative compromise. Checking only public resolvers may create confusion caused by caching or propagation delays. Using both provides a more complete view of how your domain is resolving.
4. Define an Approved DNS Change Process
Legitimate changes, such as a CDN migration or new email provider, should follow a documented approval process. When an alert fires, your team should be able to check the change log quickly rather than guessing whether the alert is genuine.
5. Configure a DNS Monitoring Tool
Choose a DNS monitoring service or broader infrastructure monitoring platform that can:
- Check records at regular intervals
- Compare records against an approved baseline
- Normalise record order and expected variations
- Monitor authoritative nameservers directly
- Cross-check multiple recursive resolvers
- Record the history of DNS changes
- Send alerts through your existing incident response channels
Keeping DNS monitoring alongside HTTP, SSL and port monitoring can make it easier for your team to investigate related problems from one place.
6. Use Multiple Monitoring Locations
Multi-region checks help distinguish a genuine DNS change from a temporary resolver problem on one network. DNS caching and polling intervals mean that “real-time” monitoring usually means detection within minutes rather than instantaneous detection.
7. Monitor SSL Certificates and Domain Expiry
Pair DNS monitoring with SSL certificate and domain expiration monitoring. An expired domain can sometimes be registered by an attacker before the organisation renews it, allowing the attacker to take control of services that depend on that domain.
How to Configure DNS Change Alerts
DNS monitoring is only useful if alerts reach someone who can respond. Avoid sending every critical alert to an inbox that is checked only once or twice a day.
- Send alerts to Slack, Microsoft Teams or Telegram: Chat-based notifications can provide faster team visibility than email alone.
- Escalate critical record changes: Changes to NS or MX records should notify on-call staff directly rather than relying on a general channel.
- Keep an alert history: Record what changed, when it changed and how the issue was resolved. This supports post-incident reviews and helps explain the timeline to leadership, customers or regulators.
- Reduce false positives: Normalise record ordering and allow for approved changes and expected DNS propagation. Multi-region confirmation can help prevent one resolver issue from creating unnecessary noise.
The goal is not simply to generate more alerts. It is to create reliable DNS security alerts that your team trusts and acts on quickly.
What to Do After a Suspected DNS Hijacking Attempt
If DNS monitoring identifies an unexpected change, follow a documented incident response process. Preserve evidence before making changes where possible.
- Confirm that the change was unauthorised: Compare the alert with your internal change log and check with the team responsible for DNS.
- Preserve evidence: Export or screenshot the current DNS records, registrar activity logs and relevant Certificate Transparency entries.
- Secure the registrar account: Reset passwords, enable two-factor authentication and review the registrar’s audit log for additional changes.
- Rotate related credentials: Assume that API keys, tokens and integrated services may be exposed if the registrar account was compromised.
- Contact the registrar’s security team: Ask them to revert unauthorised changes or freeze the domain while the incident is investigated. For .uk domains, Nominet also provides processes for reporting domain abuse and may assist if your registrar is unresponsive.
- Restore the verified DNS baseline: Revert records using your documented configuration once access has been secured.
- Check email security: Investigate MX changes, mailbox access and password-reset activity. Email is often the recovery route into other systems.
- Assess legal and privacy obligations: In the UK, consult legal or privacy colleagues promptly to determine whether the incident may constitute a personal data breach under UK GDPR.
- Notify affected users where appropriate: If credentials or sensitive data may have been exposed, communicate clearly and provide advice on password resets and account protection.
- Update your status page: A transparent status update can help maintain customer trust while the investigation continues.
How to Harden DNS Beyond Monitoring
DNS monitoring provides fast detection, but it should be combined with controls that reduce the likelihood and impact of a hijacking attack.
- Enable a transfer lock: This helps prevent your domain from being transferred to another registrar without authorisation. Where available, a registry lock adds an out-of-band verification step before significant domain or nameserver changes can be processed. Availability varies by registrar and top-level domain.
- Use DNSSEC: DNSSEC digitally signs DNS responses so validating resolvers can detect spoofed or tampered responses in transit. DNSSEC does not prevent an attacker with registrar access from changing your records and signing malicious records with your keys, so it should not be treated as a substitute for registrar security.
- Use strong, unique passwords and two-factor authentication: Apply these controls to every registrar, DNS provider and domain management account.
- Restrict DNS administration: Follow least-privilege principles and give DNS management access only to people who need it.
- Maintain a versioned DNS configuration: Keep clean, dated snapshots so unauthorised changes can be identified and reversed quickly.
- Follow recognised guidance: The UK National Cyber Security Centre (NCSC) provides useful guidance on domain and DNS security for UK organisations.
These controls are straightforward, but they are easy to postpone until an incident occurs. Implementing them proactively is far less disruptive than responding to a prolonged phishing campaign.
DNS Hijacking and Monitoring FAQ
How would I detect if my DNS records were hijacked?
The most reliable method is continuous DNS record monitoring that checks A, AAAA, CNAME, MX and NS records against authoritative nameservers and alerts you to unexpected changes. This is particularly effective against registrar-level and authoritative DNS compromise.
DNS monitoring alone will not detect every attack. Cache poisoning and compromised home routers can affect specific users without changing your authoritative records, so they require additional controls such as DNSSEC validation and endpoint security. Uptime monitoring alone is also insufficient because a hijacked domain may continue responding normally from the attacker’s server.
What is the fastest way to respond to a DNS hijacking attempt?
Secure the registrar account immediately, preserve evidence and contact the registrar’s security team to reverse the unauthorised change. Restore your verified DNS baseline, rotate potentially exposed credentials and check whether email accounts were compromised.
Can DNS monitoring prevent DNS attacks?
No. DNS monitoring does not prevent an attacker from attempting a hijack, and it does not address every attack type. Its main benefit is reducing the time between an authoritative DNS attack and your team becoming aware of it.
Used alongside DNSSEC, registrar or registry locks, two-factor authentication and a clear incident response plan, real-time DNS monitoring can turn a days-long undetected breach into a short, manageable incident.
DNS Monitoring Checklist: Where to Start This Week
DNS hijacking is difficult to spot because it can pass every check that asks only whether something is responding. Start with this checklist:
- Document a verified baseline of your A, AAAA, CNAME, MX and NS records.
- Set up DNS record change monitoring that queries authoritative nameservers and cross-checks multiple resolvers.
- Enable two-factor authentication and a transfer lock, or a registry lock where available, on every registrar account.
- Send critical DNS alerts to on-call staff rather than a shared inbox.
- Monitor SSL certificates and domain expiry alongside DNS records.
- Write down your incident response steps, including evidence preservation and credential rotation.
DNS monitoring complements registrar hardening and a clear incident response plan; it does not replace either. Put all three in place and DNS hijacking can become a minutes-long security incident rather than a days-long crisis.